
Intercom
For Akuvox, 2N and DoorBird
Step 1 : Create a SIP account for the outdoor intercom unit on our Cockpit
- Make sure you have already created your account on our Cockpit (see relevant chapter).
- Log in to your account (see relevant chapter).
- Select "Administration", "Sip Account".
- Select the building from the list of buildings (the building and its dwellings must have been created beforehand, see relevant chapter).
- Add an extension to the name of the building as below :
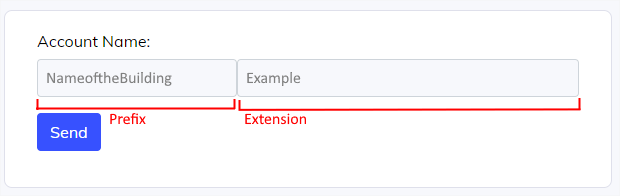
The prefix is the name of the building and can not be modified. In this example, the extension is "Example" and the complete name account is "NameoftheBuildingExample".
- Click "Send".
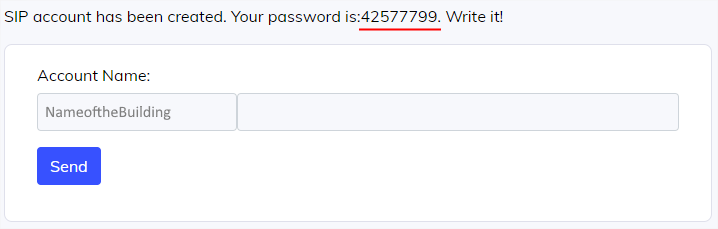
- The SIP account password is automatically generated and appears as below :
Keep this password safe! In case of loss of this password, you can request it again by clicking on the "envelope" button :

The password will be sent to your email address (check your spam box if you don't receive anything after a few minutes).
To summarize, the name of the SIP account created is "NameoftheBuildingExtension" and the related password is "42577799".
If you install several outdoor units, you must repeat this step for each unit.
Step 2 : Retrieve SIP account name of an Amika from our Cockpit
- When an Amika is correctly set-up and added to a dwelling on the cockpit (see relevant chapter), a SIP account is automaticaly generated.
- On the cockpit, select "Monitoring", "Dashboard".
- Select the building from the list of buildings.
- Select the dwelling from the list of dwellings.
- The account name of the SIP account of the Amika appears as below :

This account name is generated automatically and is used to configure the outdoor unit.
In case of multiple dwelling units, you must repeat this step for each Amika.
Step 3 : Configure the outdoor intercom unit
Akuvox (all models)
- Before starting, please read the manufacturer's manual carefully.
- Connect and start the Akuvox outdoor station.
- Configure its network settings and make sure you have Internet access.
- Make sure your computer is connected to the same local area network (LAN).
- From your computer's web browser, access the configuration interface of the Akuvox outdoor unit as explained in the manufacturer's manual.
SIP Settings
- In "Account" menu, the "Account 1" must be "disabled".
- The "Account 2" must be "enabled".
- In "Account 2" settings, enter the SIP account name that you previously created in "Register Name" and in "User Name" (in our example : NameoftheBuildingExtension).
- Enter the related password (in our example : 42577799).
- In "Preferred SIP Server" settings (or "SIP Server 1", depending on the model), enter : backend.eco-system.ch
- Click "Submit" to validate.
- Check the status in "SIP Account" settings : it must be "Registered".
- If it's "Unregistered" after few seconds, please start over from step 1.
Relay Settings (for an electric door strike)
- In "Intercom", "Relay", the parameter "Open Relay Via HTTP" must be "Enabled".
- Enter a UserName and a Password (you can choose the username and password of your choice up to a maximum of 32 characters).
- In our example, we will use "relay" for both UserName and Password.
- Click "Submit" to validate.
Contacts Settings
- To create the list of contacts, click on "Contacts", "Contacts list".
- In "Contact Setting", enter the "Name" (it is the name that appears on the outdoor unit and it can be either the name of the tenant, or the number of the dwelling).
- In "Phone" (or "Phone Num" depending on the model), enter the SIP account of the Amika, in our example : vvomCFKjr82jteZYuJ7M.
- In "Dial Account" (or "Ring" depending on the model), select "Account2".
- Click "Add".
- Repeat the same process for each tenant/dwelling/Amika.
Koch AG (installation of the AVS2100 gateway mandatory)
- Before starting, all Koch devices must have been pre-set by René Hoch AG.
Step 4 : Configure Amika
- Click "Settings", "System Management", "System Settings".
- Enter your "Installer code" (if you start Amika for the first time, you must create your installer code).
- Select "Intercom".
- Select the type of intercom.
For Akuvox (all models)
- Select "Akuvox"
- Enter the "SIP username" (in our example : NameoftheBuildingExtension).
- In "User" and "Password", you must enter the info of the "Relay Settings" (in our example : "relay" for user and password)
- Enter the IP address of the Akuvox outdoor unit.
- Enter the relay number (1 by default, physically corresponding to relay A of the outdoor unit).
- Click "Validate and back".
- Click "Close" to leave the system settings.
- You can now proceed a test by calling the related contact on the Akuvox outdoor unit.
For Koch AG
Step 1 : Create a SIP account for the outdoor intercom unit on our Cockpit
Still have questions ?
Give us a feedback
Lorem ipsum dolor sit amet, consectetur adipiscing elit. Suspendisse varius enim in eros elementum tristique.
Contact our support
Lorem ipsum dolor sit amet, consectetur adipiscing elit. Suspendisse varius enim in eros elementum tristique.